A Step-By-Step Guide to Booting Hackintosh to Striped RAID
 Almost two years ago, I bought a Hackintosh: a normal Intel PC that can be converted to run Mac OS X, resulting in an $800 computer with the power of a $2400 Mac Pro. I can't remember the last time I've been so pleased with a computer purchase, especially two years later. One important decision I made was to go with a Solid State Drive for the boot drive. The biggest bottleneck in common use of most modern personal computers is the hard drive access; processors are fast, memory is fast, but hard drives are slow. As if using an SSD wasn't fast enough, I bought two of them and used RAID striping, a technique which splits the data evenly across both drives, so when I want to load a file, half of the file is read from one disk and half is read from another in parallel. As you might imagine, it's pretty speedy. The computer I bought was the recommended setup that Lifehacker guaranteed would work as a Hackintosh, with a few small variations. Back when I originally did the hacking to get Mac OS X to run on it, there was no known way to boot to a RAID array, so I had to boot to a USB flash drive, and then select my RAID disk. This was especially annoying since I've gone all wireless, because I'd have to keep a wired keyboard around to plug in for navigating the boot menu.
This past week, however, through a sequence of turning off my computer mid-boot several times, I managed to break its ability to boot to the USB flash drive, thus bricking my entire computer. In the two years since my original setup, the Hackintosh community has been hard at work improving and streamlining the boot and hacking process. This thing called MultiBeast has been invented and the Chameleon bootloader has grown a lot too.
The Guide
Here are the steps I used, after going down many wrong paths, to finally get my Hackintosh working with Mac OS X 10.6.7. Step 3 is specific to my NVIDIA GeForce 9800 GTX+ 512 MB video card.
Step 1: Create RAID array and install Mac OS X
- Download iBoot (you have to register for the forum) and burn the disk image to a CD.
- Boot to your iBoot CD.
- When you get to the Chameleon menu, insert your Snow Leopard DVD and press F5, select the DVD and press Enter to boot to it.
- Once you're in the Mac OS X installer, choose Disk Utility from the Utilities menu.
- Select one of your SSDs, and select the RAID tab. Drag both SSD disks into the RAID set, and pick a name for your RAID set (I called mine "HD"). Make sure you've got "Mac OS Extended (Journaled)" selected as the Format, and "Striped RAID Set" as the RAID Type, and hit "Create".
- Close Disk Utility and continue on with the Mac OS X setup, selecting your RAID set as the disk to install the operating system to.
- When you finish the install, reboot – still to the CD! – and select your SSD drive from the boot menu.
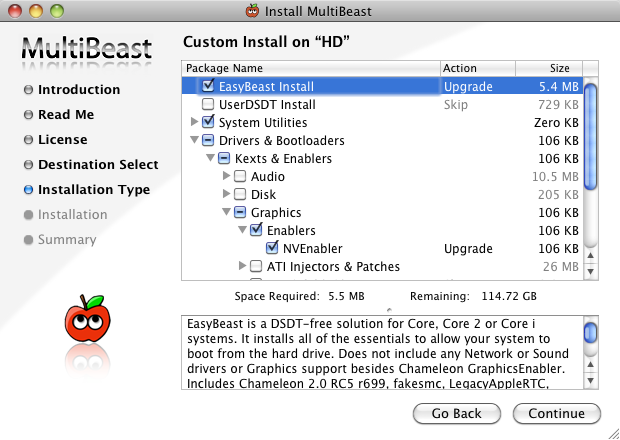
Step 2: Install MultiBeast
-
Download (using the forum login you created earlier) and run MultiBeast
-
I checked the following boxes in MultiBeast:
 3. Hit Continue, allow the boot drive default install destination, and install MultiBeast.
4. In Terminal, run this: `cp -R /Extra ~/Desktop/Extra`
3. Hit Continue, allow the boot drive default install destination, and install MultiBeast.
4. In Terminal, run this: `cp -R /Extra ~/Desktop/Extra`
Step 3: Install the GFX String for your video card
If you're lucky, you may not need this step, but I could not get Snow Leopard to recognize my NVIDIA GeForce 9800 GTX+ 512 MB video card, leaving me at 1024x768 video resolution and no multi-monitor support. If you're having video card problems without doing this step, come back and try it.
Note: When I did the original iBoot + MultiBeast method, which includes immediately installing the 10.6.7 Combo Update, only some of my video card's capabilities were recognized after this step. It's important to do this step before you upgrade to the latest version of Snow Leopard.
-
Go here and download the file for your video card and unzip it on your Desktop.
-
In Terminal (vary the directory name as appropriate):
cd ~/Desktop/gfxutil\ 512\ MB\ 9800\ GTX/ ./gfxutil -f display -
This should print out something that looks something like this:
DevicePath = PciRoot(0x1)/Pci(0x1,0x0)/Pci(0x0,0x0)Copy the part to the right of the = to your clipboard. -
Edit the in.plist file. Use "nano" instead of "vi" if you wish.
vi in.plistAt the top of the file, you should see something that looks like the PciRoot string you just copied to your clipboard. Replace what is in the file with the value from your clipboard.<key>PciRoot(0x1)/Pci(0x1,0x0)/Pci(0x0,0x0)</key>Save the file. -
Now run:
./gfxutil -i xml -o hex in.plist out.hexThis will generate a file called out.hex with the GFX string for your video card in it. -
Copy the contents of out.hex to your clipboard like so:
cat out.hex | pbcopy -
Now we need to insert this GFX string into your com.apple.Boot.plist in the copy (the one on your Desktop) of your Extra directory.
vi ~/Desktop/Extra/com.apple.Boot.plistGo down to the bottom before the line and add the following two lines, pasting your GFX string where you see my long hex value.<key>device-properties</key> <string>d20300000100000001000000c60300001500000002010c00d041030a 0100000001010600000e0101060000007fff04003a000000400032002c006800 7700730065006e0073006f0072002d0070006100720061006d0073002d007600 65007200730069006f006e000000080000000000000222000000400032002c00 6400650076006900630065005f0074007900700065000000120000004e564441 2c6770752d64696f64650e0000004e00560050004d0000002000000001000000 0000000000000000000000000000000000000000000000001e00000072006f00 6d002d007200650076006900730069006f006e00000009000000333137326110 0000004e00560043004100500000001800000004000000000003000c00000000 0000070000000022000000400032002c002300730069007a0065002d00630065 006c006c0073000000080000000000000022000000400030002c006400650076 006900630065005f00740079007000650000000b000000646973706c61791000 00006d006f00640065006c0000001f0000004e5649444941204765466f726365 2039383030204754582044444c14000000400030002c006e0061006d00650000 00120000004e5644412c446973706c61792d4120000000400032002c0063006f 006d00700061007400690062006c0065000000160000004e5644412c73656e73 6f722d706172656e7414000000400031002c006e0061006d0065000000120000 004e5644412c446973706c61792d4212000000400032002c0072006500670000 0008000000000000021c0000006400650076006900630065005f007400790070 0065000000100000004e5644412c4765466f72636520000000400031002c0063 006f006d00700061007400690062006c00650000000e0000004e5644412c4e56 4d616326000000400032002c0023006100640072006500730073002d00630065 006c006c007300000008000000000000010e0000006e0061006d00650000000f 0000004e5644412c506172656e7422000000400031002c006400650076006900 630065005f00740079007000650000000b000000646973706c61792000000040 0030002c0063006f006d00700061007400690062006c00650000000e0000004e 5644412c4e564d6163220000005600520041004d002c0074006f00740061006c 00730069007a0065000000080000000000002036000000400032002c00680077 006300740072006c002d0070006100720061006d0073002d0076006500720073 0069006f006e000000080000000000000214000000400032002c006e0061006d 00650000001100000073656e736f722d706172656e74</string>
I have broken up the hex string here for formatting purposes, but you should make sure that you have no spaces between the
Step 4: Make your RAID Set bootable
-
Open Disk Utility (under /Applications/Utilities), right-click on your RAID Set, and choose Information. You should see something like this:

Copy the Universal Unique Identifier to your clipboard. You'll need it in a second.
-
Open the com.apple.Boot.plist in the copy (the one on your Desktop) of your Extra directory. Use "nano" wherever I have "vi" if you don't feel comfortable with vi.
vi ~/Desktop/Extra/com.apple.Boot.plist -
Where you see something like this:
<key>Kernel Flags</key> <string>arch=i386</string>Paste in your Universal Unique Identifier to make it look like this:<key>Kernel Flags</key> <string>arch=i386 boot-uuid=6EC2F54F-287B-38E2-BB6D-A0FFECA995BD</string> -
Okay, now we're done preparing our Extra folder, so we need to set its permissions.
sudo chmod -R 644 ~/Desktop/Extra sudo chown -R root:wheel ~/Desktop/Extra -
Now we need to identify the internal device names for your two RAID drives. These change every time you boot your computer, so this step is needed every time (should you run through this guide more than once) before we continue with the following steps.
diskutil list

Look for the two entries with an "Apple\_RAID" entry in them. The important numbers to remember are the integers immediately following "/dev/disk" in the header rows for those entries. Sometimes it will be disk0 and disk1, but other times it may be disk3 and disk5 or whatever, depending on how many hard drives you have installed. Just remember those two numbers and substitute them wherever you see me use "disk0" and "disk1" in this tutorial.
-
Download the latest version of Chameleon, which is 2.0-RC4 at the time of this writing, and unzip it to your Desktop.
-
Each RAID array drive has a secret "Boot OSX" partition on it where we need to put our Chameleon bootloader.
Run the following commands, replacing the Chameleon folder name with whatever version you downloaded. You may be prompted for your password for the first sudo command. Keep in mind that wherever you see disk0 and disk1, you need to replace it with your two disk identifiers from step #5 above.
cd ~/Desktop/Chameleon-2.0-RC4-r684-bin/i386/ sudo fdisk -f boot0 -u -y /dev/rdisk0 sudo fdisk -f boot0 -u -y /dev/rdisk1 sudo dd if=boot1h of=/dev/rdisk0s3 sudo dd if=boot1h of=/dev/rdisk1s3 diskutil mount disk0s3 sudo cp boot /Volumes/Boot\ OSX/ sudo cp -R ~/Desktop/Extra /Volumes/Boot\ OSX/Extra diskutil unmount disk0s3 diskutil mount disk1s3 sudo cp boot /Volumes/Boot\ OSX/ sudo cp -R ~/Desktop/Extra /Volumes/Boot\ OSX/Extra diskutil unmount disk1s3 -
Now we're going to activate those "Boot OS X" partitions. Some of these commands are inside fdisk. You may need to confirm with a "y". Look at the screenshot if you're unsure. Don't forget to substitute your disk identifiers.
sudo fdisk -e /dev/rdisk0 f 3 w q sudo fdisk -e /dev/rdisk1 f 3 w q
 9. Remove your iBoot CD.
10. Reboot, but hit DEL to enter BIOS.
11. Set your BIOS to boot to one of your RAID drives first.
12. Press F10 to save your BIOS settings and reboot. It should boot properly to Snow Leopard on your RAID drives, faster than you've ever seen Mac OS X boot.
9. Remove your iBoot CD.
10. Reboot, but hit DEL to enter BIOS.
11. Set your BIOS to boot to one of your RAID drives first.
12. Press F10 to save your BIOS settings and reboot. It should boot properly to Snow Leopard on your RAID drives, faster than you've ever seen Mac OS X boot.
Step 5: Update your operating system
You can probably do this via Software Update, but I already had the 10.6.7 Combo Update downloaded from previous attempts, so I did that first.
That's it! You're done!
Bibliography
I got most of my information from the following helpful guides.
- Lifehacker: How to Build a Hackintosh with Snow Leopard, Start to Finish
- Lifehacker: How to Build a Hackintosh and Install OS X in Eight Easy Steps
- tonymacx86: iBoot + MultiBeast: Install Mac OS X on any Intel-based PC
- aquamac forums: GFX Strings - How To
- InsanelyMac: Chameleon 2 RAID - More complete tutorial
This process involves a lot of trial and error and reading about others' trials and errors. My main motivation for writing this post was to give others yet another guide to try when others have not worked, and to record exactly what I did that worked while it's still fresh on my mind.